Showing posts with label DIY. Show all posts

20 December 2010

DIY: Art for Children's Rooms (From Bali With Love)

I saw this adorable idea to decorate your child's room with paper dolls and their clothes. Just cut out the shapes, frame them and hang in your child's room.
Toni over at Design Dazzle offers several different links for free downloads. Go HERE to see her full post. Enjoy!

Taken from Design Dazzle.

02 October 2010

A Mobile For My Daughter (From Bali With Love)

One thing I never bought for my daughter, when she was born, was a mobile for her room. Living in Indonesia makes it sometimes difficult what you want, especially when it comes to shopping for a baby. SO, I want to make a mobile to hang in my daughter's room. I found several, over the last year, that caught my eye and now I'm having a hard time picking just one project to do! 
Maybe YOU can help me decide!
Here are the DIY mobiles that I've bookmarked:
Butterfly Mobile; taken from HERE.
Origami Style Moravian Star Mobile; taken from HERE.
Ikea Hacked Mobile Pendant Light; taken from HERE.
Modern Paper Mobile; taken from HERE.
Fabric Circle Mobile; taken from HERE.
Paper Crane Pendant Light; taken from HERE.
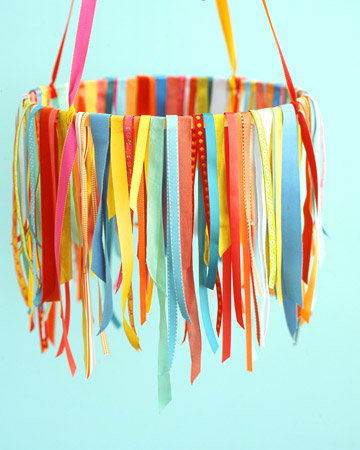
Ribbon Mobile; taken from HERE.
Butterfly Mobile from Etsy; shop now not found. :(
Modern Circle Mobile; taken from HERE.
Creative Felt Mobile; taken from HERE.
Ribbon Garland; taken from HERE.
Vintage Toy and Trinket Mobile; taken from HERE.
Feather Mobile; taken from HERE.
Another Feather Mobile; taken from HERE.
Bird Mobile; taken from HERE.
Eco Friendly Mobile; taken from HERE.
Fabric Pinwheel Mobile; taken from HERE.

I love them all, but I definitely have a few favorites out of these. I may end up doing a combination of a few ideas featured here, if I can find all of the materials I need, here in Bali, to make them!
SO, what are YOUR thoughts? Which ones do YOU like?

24 September 2010

DIY: Jewelry Station (From Bali With Love)

What do you get when you take a $1 window screen and a free nightstand, that you found on the side of the road????
A fabulous, one stop, catch-all storage for your jewelry!
The nightstand was painted white and topped with fabric. The screen was kept, as is, for an earring holder and necklaces and bracelets were organized and stored in the drawers.
I LOVE this! I've been searching online for ideas for a DIY earring/necklace rack and I thought about a window screen but was unsure of how it would look. Well, now I know....FABULOUS!
I can't WAIT to get my jewelry organized. I want to combine mine with a makeup table! :) More to come on that at a later time...stay tuned!
Taken from HERE.

17 September 2010

DIY: Sailor Knot Doorstop/Paperweight (From Bali With Love)

I've seen these sailor/anchor knots in many design magazines and adorning some coastal homes as a doorstop. So, I was pretty excited when I came across the DIY version. The guide uses this knot as a doorstop or paperweight, but I think if you made a smaller version, it could easily be used for curtain tie backs as well. 
So, think outside the box. What would you use them for?
I'm not a big knot tier, but it actually looks pretty easy.
To see the full DIY instructions, go HERE.

04 September 2010

DIY: Chalkboard Ideas (From Bali With Love)

Chalkboards are great for children's play or adults to-do lists. Here are a few chalkboard ideas from my files.
A chalkboard canvas, as wall art, in your home is a great idea to entertain children, a great conversation piece while entertaining guests AND it's easy to take down and move into another room, if you desired. I love this!! Taken from Ohdeedoh.

A chalkboard play table. This amazing makeover features chalkboard paint on the table so you can draw on it! What kid wouldn't love to be "allowed" to draw on furniture? I'd love to do this DIY project for my daughter. See the before pictures as well as the how to HERE. Found via Design Dazzle.

Kid's playzone. This is a great project for a child's room or play room. Get the know-how HERE. Taken from Ohdeedoh.

03 September 2010

DIY: Potting Bench (From Bali With Love)

I've been thinking about building my own potting bench. Nothing fancy, just something simple and sturdy like this one:
Taken from Design Sponge.

DIY: Toddler Bed (From Bali With Love)

I love, love, love this toddler bed made from wood pallets.
Get the how-to HERE. Taken from Design Sponge.

27 August 2010

DIY: Spruce Up Any Cabinet (From Bali With Love)

This is great, inexperience and beautiful. Spruce up any cabinet with leftover wallpaper...you could even use contact paper bought from a $1 store and achieve a work of art!
Taken from HERE.

25 August 2010

DIY: Wall Art...with postcards? (From Bali With Love)

Love this idea of creating a wall or inspiration board of postcards.

Have you heard of FROM THE RIGHT BANK? If not, check it out. Ally is a super awesome, sweet blogger! She seems so friendly, always replies and comments back to her reader's and posts some of the best design ideas. She is definitely on my Top 5 favorite blogs list!

20 August 2010

DIY: Message Board (From Bali With Love)

Make a message board from a cookie sheet! What a great and inexpensive idea!
See the how-to HERE.

16 August 2010

DIY: The Dish & The Spoon (From Bali With Love)

Check out this adorable doll set, The Dish and The Spoon! 
I'm not that great with sewing, but would love to make these for my daughter. And guess what? The patterns are FREE!
If you want to make your own, just go HERE to get the pattern.
Found on Ohdeedoh. Taken from Happy Together.

13 August 2010

DIY: Bike Fence? (From Bali With Love)

Hot or Not? Recycled bike frames for a fence.
I think it's kind of cute, placed in the right setting like a school yard or playground.
Taken from Apartment Therapy.

30 July 2010

DIY: Luminarias (From Bali With Love)


What You Need:
  • Metal cans in assorted sizes, cleaned and with paper labels removed and saved
  • Plain paper cut to fit the can (optional)
  • 16-penny square nail
  • Awl
  • Hammer
  • Punch-style can opener
  • 16-gauge galvanized wire
  • Pliers
  • Votive candle


Instructions:
1. Fill the cans with waterand freeze them overnight. (Freezing makes it easier to hammer a design into the can without damaging the shape of the can.) Don't worry if the bottoms bulge slightly from the pressure of the ice.
2. To make the paper pattern, use the wrong side of the label or plain paper trimmed to fit. Fold the paper in quarters to keep the design elements evenly spaced. Unfold and draw lines, stars, chevrons, squares, Vs, or other simple geometric shapes on the paper.
3. Tape the paper over the can, and place the can on a folded towel to protect the work surface. Using the 16-penny nail (for square holes) or awl (for round holes), hammer through the design into the can and ice.
4. Let the ice melt completely. If the bottom of the can became distorted in thefreezer, gently hammer it back in place. Use the punch-style can opener to make triangular holes along the top and bottom edges of the can.
5. To hang luminarias, cut a 20-inch length of wire and bend it into a U-shape. Insert the ends from the inside of the can to the outside through holes in opposite sides of the can. Curl the ends back over the top of the can. Place a votive candle in the can.

I WANT TO DO THIS IN MY GARDEN. I WOULD, OF COURSE, USE CITRONELLA CANDLES TO WARD OFF INDONESIA'S PERSISTENT MOSQUITOS. :)

09 July 2010

DIY: Scarf Pillows & Frames (From Bali With Love)

This woman never ceases to amaze me. I just love Jenny from the Little Green Notebook. I've blogged about her several times before. She has the best decorating ideas on her blog and she shows you many ways and examples of how to accomplish a great look for a great price. :)

I love this idea of using scarves to make pillows! A few years ago, I got a whole pile of scarves from my mother...scarves worn in the 80's and early 90's. I remember she used to wear them to work in her blazer pocket or tied around her neck for a loose cowl look. Sometimes, she would even thread them through the loops of her skirt or slacks to serve as a fun belt. When I moved overseas to Bali, I sold most of my stuff and packed up the rest. I honestly can't remember if they went into my box of items to keep or to donate?!?! I sure hope I saved them so I can do this project when I move back to the states. Jenny also suggests framing scarves, which I've seen done in many design magazines before. This is such an easy and CHEAP project to add that something special to your room. You can even use this project to showcase favorite heirlooms, such as your Grandmother's favorite scarf.

Here are SOME of Jenny's post ideas. You can see Jenny's full post HERE.

Jenny also provided links on her post that show how to do this project HERE and HERE.

02 July 2010

DIY: Rope Art (From Bali With Love)

This is so cool, inexpensive and the possibilities are endless as to the "pictures" you can create as wall art. I know I can find these materials in Indonesia! I could make art for Akira's room, the living room...ooohh, I could make trivets for hot pots fresh off the stove! Now, my thoughts are flying!

Related Posts Plugin for WordPress, Blogger...